How To Check For RDRAND Bug on Ryzen
What is RDRAND?
As a broad overview, RDRAND is a method of returning pseudo-random numbers from the CPU. Originally, it was developed by Intel, however it has since been implemented on AMD CPU’s, which is of course where this bug lies.
If you are a Windows user, you can still be affected by this bug, you’re just less likely to notice. The theoretical security implications will still affect you, and you should still fix it.
Further reading: Wikipedia - RDRAND
What is AMD Ryzen’s RDRAND Bug?
On some Ryzen CPU’s, whenever RDRAND is called it will return the extremely random value of 0xffffffff every single time. I would highly recommend reading Jim Salter from Ars Technica’s article on this bug since it will explain more about the bug, and for testing I will have you using his code later.
This has been a very irritating bug that has afflicted me for a while. Using a Linux system, I have found that Linux will soft lockup at random periods. Usually during low CPU usage such as browsing the internet. The GUI would lock up, and I would be unable to click, or use any UI elements. I could still switch to another TTY, however I was unable to recover the GUI.
According to Jim Salter, these soft lockups are related to SystemD’s handling of bad RDRAND output. Although I’m admittedly unsure as to what SystemD is specifically doing with RDRAND that causes this. If you have an idea, please email me and let me know!
While I felt that while Jim Salter’s article was fantastic, it is a little unclear for those unfamiliar with Linux on how to test it. This step-by-step guide should show you how to test for it yourself, and again I will be using same code Jim Salter provided.
Step-By-Step Testing Guide
If you are already using Linux, or know how to setup Linux bootable disks, skip to step 4 for testing
-
Download necessary files
-
We will be using Ubuntu for this tutorial, which can be downloaded here
-
Download and launch Rufus
-
-
Flash the iso to a thumb drive
- In Rufus, select your thumb drive under ‘Device’. Note that all data on this device will be destroyed!
- Under ‘Boot selection’ choose your Ubuntu .iso file
- ‘Partition scheme’ should be MBR, and ‘Target system’ should be BIOS or UEFI
- The rest of the settings can remain the same, click ‘START’ and wait for Rufus to finish
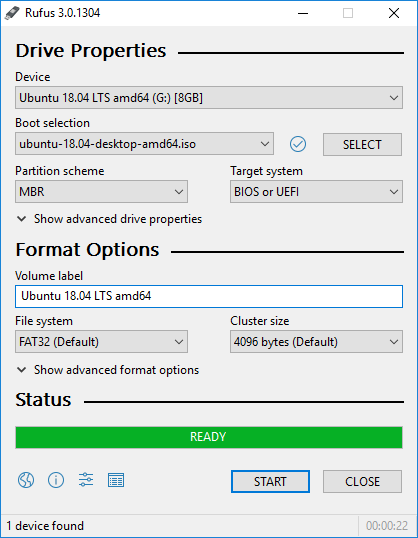
Image from https://rufus.ie
-
Reboot into Ubuntu
- With the thumb drive plugged in, reboot to your computer’s BIOS. Exact steps are dependant on your motherboard manufacturer, but usually during boot you can keep pressing the F12 or Delete key
- Once in your BIOS, look for a boot menu and select your thumb drive to overwrite the boot order
- Ubuntu may prompt you to “Try Ubuntu without installing” or “Install Ubuntu”. You will choose Try Ubuntu without installing
You should not encounter any partitioning at any time during this tutorial. If Ubuntu is asking you to partition, you may have chosen “Install Ubuntu” which is not what you’re looking for
- You should see Ubuntu loading, and eventually see a desktop
- Connect to the internet by using the WiFi button at the top right, searching “WiFi”, or by just using ethernet
-
Launch Terminal, and test for RDRAND bug
-
Press your ‘Windows key’, or click the 9 dots at the bottom left to bring up your system search
-
Search “Terminal” and open up the corresponding application
-
Enter this command to download Jim Salter’s test application:
wget https://cdn.arstechnica.net/wp-content/uploads/2019/10/rdrand-test.zip -
Enter this command to unzip the archive:
unzip rdrand-test.zipIf the unzip command is not found, enter this command (you will need an internet connection): sudo apt install unzip
-
Run the amd-rdrand-bug application:
./rdrand-test/amd-rdrand-bug -
The output should tell you whether or not you are affected
-
Fixing the RDRAND Bug
In the unfortunate event that you are affected by this bug, you are at the whim of your motherboard manufacturer to patch it. Fortunately, this bug was patched by AMD about a year ago as of writing, so your manufacturer has likely added the fix to their firmware.
To install the patch you need to update your motherboard’s BIOS/firmware. Unfortunately I cannot write a step-by-step guide on how to do that, since the instructions very depending on which motherboard you own. Simply search “BIOS update” with your motherboard make and model online, and you should find your manufacturers website with instructions.
Warning: Be careful when updating your BIOS/firmware. If you restart your computer, or lose power during the update your motherboard may be bricked and have to be replaced
Follow the directions provided by your motherboard manufacturer carefully
Once your motherboard’s BIOS is updated to the latest version, be sure to go through the step-by-step guide once more (you can skip straight into booting into Ubuntu. No need to re-make the thumb drive)
Running the test program should now tell you that your do not have the AMD bug.
Closing Thoughts
This isn’t the type of tutorial I would normally like to put on this website. Most of the stuff will be more technical then this. However, I did feel that there was very few tutorials online about testing for this common bug, so hopefully this tutorial will be helpful to someone!